NO SUCH FILE (WHEN USING PIPES) IN MACOS TERMINAL
Using the German keyboard, I have to use a combination of the [Alt] modifier key and other keys to be able to print characters like brackets or the pipe symbol.
Using pipes in shell commands, sometimes this happens:
$> echo "foo" | wc -l
bash:  wc: command not found
Hm. Weird. “wc” should be present on this system. Let’s check:
$> which wc
/usr/bin/wc
Hm. So why isn’t this working?
Seems like my left thumb spent a few milliseconds too long on the [Alt] key… So instead of typing [space] (pipe) [space] I typed [space] (pipe) [Alt] + [Space])… hence the bash error.
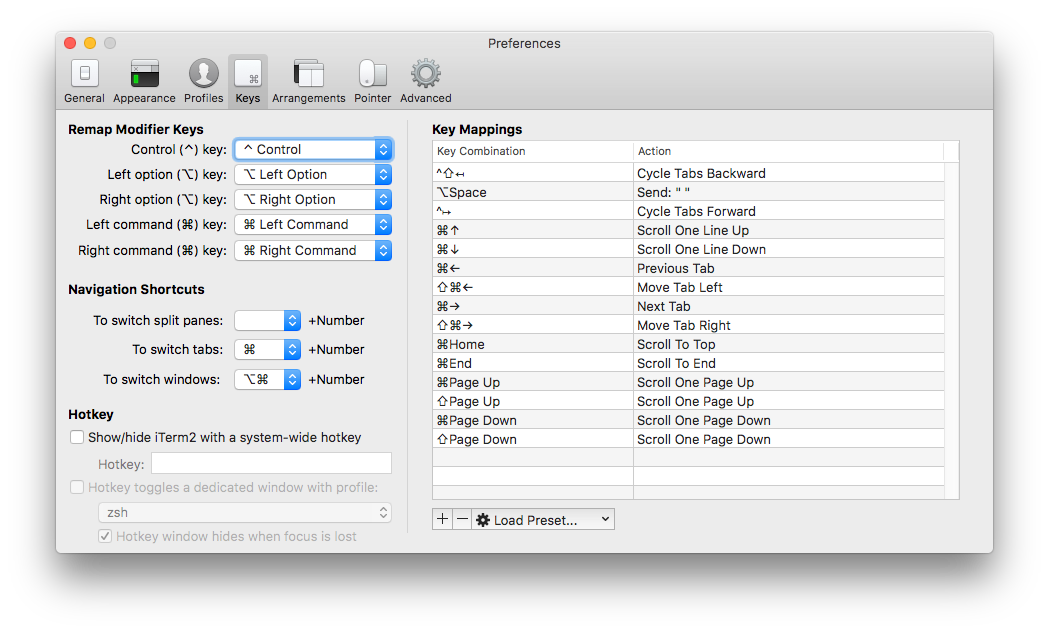
If you’re using iTerm2 as your terminal app in MacOS (you really should give it a try!), the workaround is an easy one: in the settings (Preferences – Keys) you can set the keystroke “[Alt] + [Space]” to produce a regular space:
HOW TO MIGRATE YOUR WINDOWS 7 VIRTUALBOX INSTANCE TO WINDOWS 10
I have been using virtual machine installations of the Windows operating system ever since I made the switch from Windows to Linux when I was attending university (and I have since switched to a Mac OS X setup that has been serving me very well for the past 12 years). I can get most of my daily business done on any OS but I am still in the need of using some tax/finance software that is only available for Windows. Therefore, I have migrated my physical Windows box into a VM a long time ago; I’ve been using Parallels Desktop and VMware Fusion in the past but made the move to VirtualBox about 2 years ago. So far I was running a Windows 7 guest on a OS X host.
Since Microsoft announced their free Windows 10 upgrade policy for existing users, the system has more or less pestering me with “get your copy of Windows 10” messages. I was curious about trying out the upgrade in a VM before rolling it out to any other family members' computers (I don’t really enjoy spending endless nights with my mother-in-law’s notebook…).
Unfortunately, the automatic upgrade failed. Well, of course it did. I kind of was expecting to run into trouble.
After performing a requirements check, the Windows 10 Upgrade application was complaining that my computer wasn’t meeting the hardware requirements for Windows 10, in particular the VirtualBox (virtual) graphics adapter which was accused of not being compatible with Windows 10. The VGA driver shipped with and installed by the VirtualBox Guest Additions was (of course) compatible with my current Windows 7 installation but apparently not with Windows 10.
I tried different approaches to force the installation of the graphics adapter driver for Windows 8/Windows 10 through the VirtualBox add-ons but made no progress.
Luckily, the solution was indeed fairly simple: Instead of my first attempt of letting the Windows 10 migration tool download the upgrade files and having it perform the upgrade from within Windows 7, I chose to download the Windows 10 ISO disk image provided by Microsoft by using the Media Creation Tool within the Windows 7. I was able to obtain the ISO file and transferred it outside to VM to the OS X file system (by mounting a shared folder).
Important Notice: You absolutely need to use the Media Creation Tool from within the virtual machine you want to migrate. Just downloading the regular, i.e. non-update ISO installation disc from the Microsoft website and mounting that ISO file into your VM will result in the installation process failing (and advising you to start over with your “computer”/VM running…
After properly shutting down the VM I then mounted the ISO image to the optical disk drive of the Windows 7 VM and started it. Booting off the Windows 10 installation media, the setup program found the Windows installation on my (virtual) hard drive and gave me the option to perform the upgrade. A few clicks here and there and I was good to let the upgrade procedure begin. If at this point you’re prompted to restart the upgrade from within your previous Windows installation, do so… I’ve seen one VM that required be to upgrade through the setup.exe file – but that only worked with the ISO media created by the Media Creation Tool, not with the ISO downloaded from Microsoft’s website.
Now it was time for a cup of hot espresso and a short break… The upgrade went flawlessly in the background, while I was able to complete other tasks in the meantime. Some 30 minutes later the virtual machine greeted me with a chime and the shiny new (to me) Windows 10 login screen and I was able to access my migrated user account, including all documents and applications I had previously used.
BMW 118D: FAZIT ZUM LEASING-ENDE NACH DREI JAHREN
Meine drei Jahre mit dem 1er BMW sind nun um. In dieser Zeit habe ich fast 69.000 km mit dem Wagen zurückgelegt.
(Der Wagen steht übrigens gerade bei der BMW-Niederlassung Stuttgart zum Verkauf: Angebot G1240715 (Der Wagen hat inzwischen einen neuen Besitzer.)
Die Rückgabe war unspektakulär: ich habe den von mir verbauten M-Schaltknauf zurückgebaut, den Wagen außen und innen gereinigt und ihn dann zur BMW-Niederlassung nach Stuttgart gefahren. Dort hat ihn die Dekra eine Stunde lang inspiziert. Moniert wurden ein Parkrempler an der Stoßstange vorne (ca. 230 Euro muss ich dafür zahlen) und die Windschutzscheibe mit Steinschlag (wurde nach Rückgabe noch getauscht).
Würde ich noch mal einen 1er BMW als Neuwagen leasen? Jein.
Die Fixkosten für das Leasing betrugen in 3 Jahren 18.000 Euro. Das ist eine ganze Menge Holz und für BMW ein gutes Geschäft, denn damit ist der Wertverlust des Wagens über die gesamte Leasingzeit in Gänze ausgeglichen… Die variablen Kosten für 69.000 km Laufleistung lagen bei 9.000 Euro.
Der Wagen hat pro 100 km für 7,25 Euro Diesel geschluckt. Die Gesamtkosten lagen damit bei knapp 40 Cent pro Kilometer.
Als Gegenwert habe ich drei Jahre lang ein nigelnagelneues, sehr zuverlässiges und spaßiges Fahrzeug mit meiner Wunschausstattung gefahren. An meinen Einschätzungen gleich nach 1.000 km mit dem 1er hat sich nichts geändert…
Als Betriebsausgabe (bei einem Selbständigen oder einer Firma) mag sich das Leasing-Modell rechnen. Als Privatperson hätte ich in der Zeit aber problemlos mit der gleichen monatlichen Belastung einen jungen Gebrauchten finanzieren können, der dann nach drei Jahren mir gehören würde. So habe ich halt “nur” für die Nutzung gezahlt und nach drei Jahren wieder eine leere Garage (naja, fast… da steht ja der Z4 jetzt drin…).
Farewell, my dear! Auf dass Dein neuer Besitzer ebenso viel Spaß wie ich mit Dir hat.
BMW Z4: LENKRAD NEU BEZIEHEN
Bei einem 10 Jahre alten Wagen sieht irgendwann das Lenkrad nicht mehr so richtig schick aus. Auf einen Hinweis im zroadster-Forum hin habe ich mir dann ein Lenkrad gesucht und dieses neu beziehen lassen.
Der Anbieter MeinLenkrad.de hat in seinem eBay-Shop eine Vielzahl von Lenkrädern verfügbar. Für den Umbau hat man zwei Möglichkeiten:
- entweder baut man sein eigenes Lenkrad aus und schickt es dorthin oder
- man kann (falls das Lenkrad auf Lager ist) ein bereits umgebautes Austauschlenkrad bekommen und schickt dann sein eigenes Lenkrad zurück.
Das fertige Ergebnis sieht jedenfalls fantastisch aus und passt auch wunderbar zum ebenfalls inzwischen eingetroffenen M-Schaltknauf (den ich ja schon im 1er verbaut hatte).
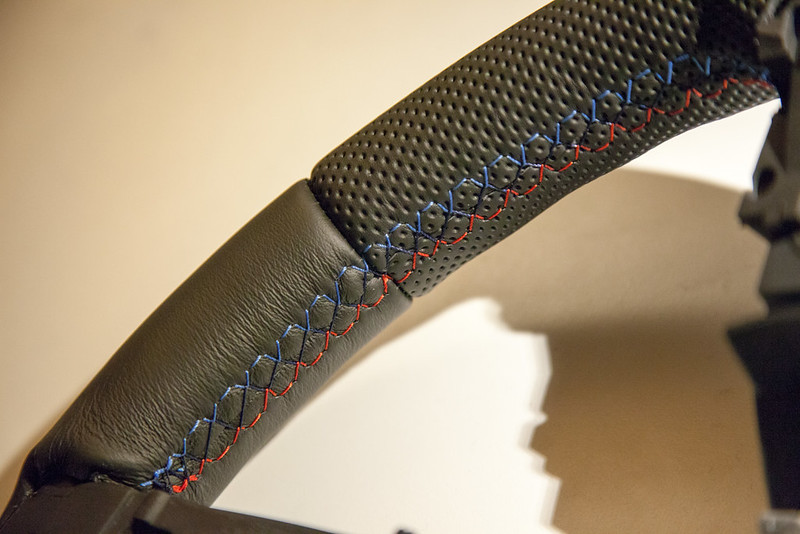
Ich bin höchst begeistert. Jetzt muss nur das kalte Weiß von den Straßen verschwinden, damit ich den Zetti wieder aus dem Winterschlaf wecken kann… 😉
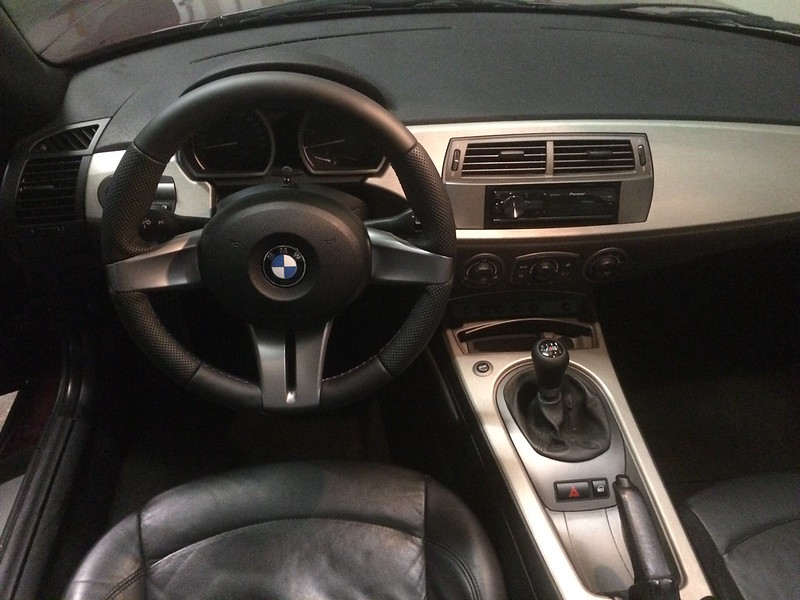
Update: so sieht das Lenkrad mitsamt M-Schaltknauf eingebaut aus:
MAC OS X: RESET VOLUME BALANCE VIA SCRIPT
I have connected a set of Logitech 2.1 speakers to the headphone/line out port of my 2013 MacBook Pro running OS X Yosemite (10.10).
Whenever I disconnect that connection (to take the MBP with me), return home, and reconnect the cables, the system volume balance seems to have run out of order, i.e., is not set to the center but to either the left or the right loudspeaker channel.
I have yet to find the reason for this behavior but was able to come up with a quick fix. I have put the source code for this solution on GitHub: reset-audio-balance.
Using Automator, you can wrap a script in a “Run as script” action, save it as an application, and add this application to your user’s login items, so the balance will be reset to center on every restart of your Mac.
Update: for your convenience, I have wrapped the script into an app (using Automator) that you can download here{.lizip}.